RV Skylight Repair
 For those who have an RV that is several years’ old, repairs often pop up due to general wear and tear. We recently experienced a water leak around the skylight in our bathroom. We inspect our roof at least twice a year and even with this effort, very fine cracks occurred in the RV skylight during our travels. On a recent trip, enough road vibration, hot sun then cool North Carolina evenings open these cracks. After a hard rain we discovered water dripping from the bathroom ceiling and knew we needed to act quickly.
Temporary RV Skylight Repair
 The RV Skylight is in two pieces. The inside unit is part aesthetics and part light diffuser. I removed the inside unit and discovered very fine cracks around the base rising up to the edge of the outside skylight. It was easy to see where water was seeping inside. Equally concerning, was the beginning of mildew and mold on the inside edge of the wood. We suspect gentle leaking started allowing a small amount of water to enter, but the cracks had not increased in size to allow larger amounts of water into the bathroom ceiling.
I caught the water leak early, treated the area multiple times with 100% bleach and a good scrub with a souring pad. I also went on top of the RV and applied Dicor Self Leveling Compound over the crack in the RV Skylight and again on the inside. This gave some assurance that we could stop the leaks until a more permanent RV Skylight replacement could be made. Allowing the inside wood to dry throughorly, I replaced the inside unit.
Removing the Cracked RV Skylight
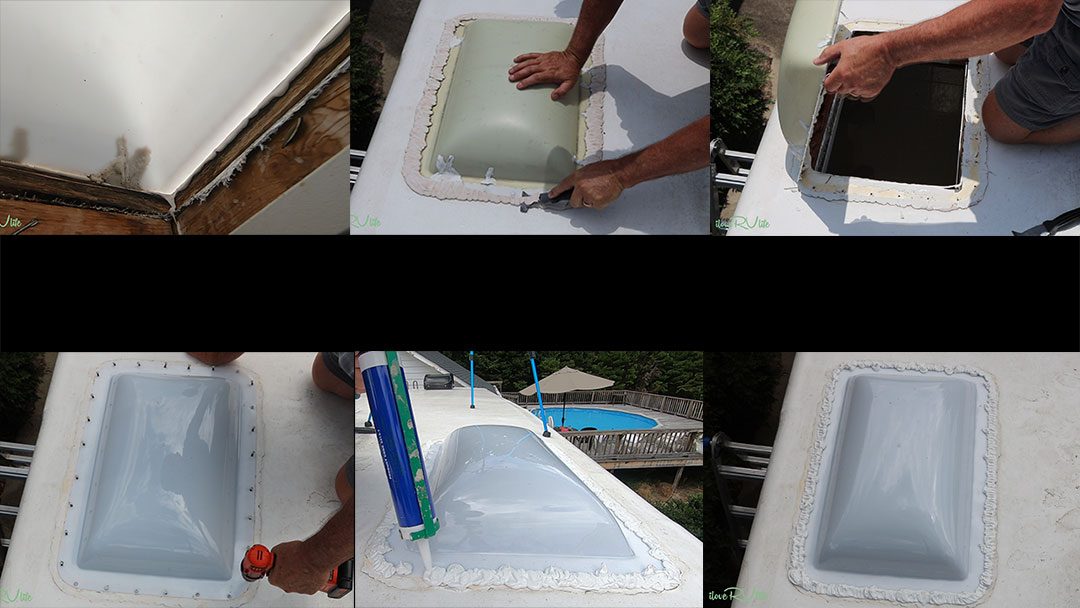
 Fortunately, an exact size RV Skylight replacement was found on Amazon. Replacing the crack unit took about an hour. First step is to remove the old lap sealant compound from around the RV skylight. This took a little patience and gentle force to scrape the lap sealant first from the top and around the screws of the plastic.
Next is to work a paint scraper underneath the RV skylight to release any sealant bonding the unit to the roof. I like using a 6-in-1 painters tool to remove the lap sealant. This tool is ridged, has a beveled edge and with careful use can easily slide against the roof without ripping or tearing the fabric.
Once the old RV Skylight is removed, I take a few extra steps to ensure the roof is clean and the old lap sealant is removed. One note, it’s very difficult to remove 100% if the old lap sealant. Work to make the roof surface as flat as possible without damaging the roof fabric.
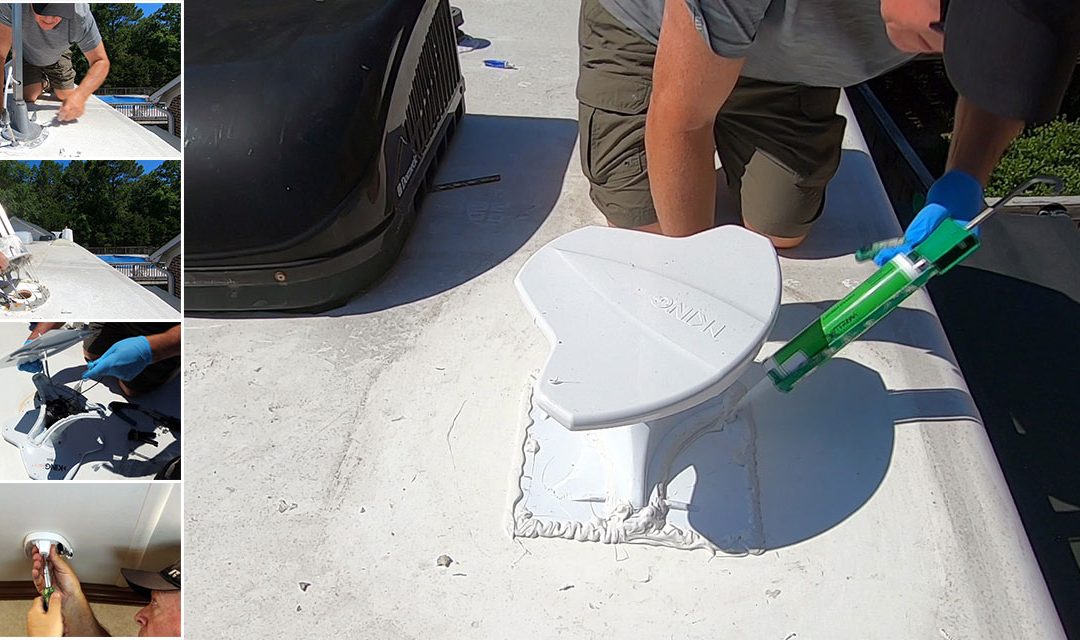
Installing the new RV Skylight
This new RV Skylight was an Amazon reseller product. It had limited screw holes, about a third of those found in the Heartland unit. I matched the old and new skylights together, marked where the holes should be located and carefully drilled, ensuring not the crack the plastic.
 Now apply a thin bead of lap sealant on the roof, just inside the screw holes. This will provide an extra bond for the RV Skylight to the roof. Placed the new skylight on the roof and lined up the holes to match. Here where more cautions applies. I did not want to over tighten the screws. I believe this was part of the reason the old skylight cracked, having too much pressure on the plastic adding stress and eventual failure.
Last step was to cover the screws and sides with lap sealant and we were done.
Overall, not a difficult installation. Using extra care removing the damage RV skylight is key and most of all, liberally applying lap sealant will ensure new leaks will not occur.
 Heavy Duty RV Camper Trailer Exterior Skylight – 18″ x 26″ OD – https://amzn.to/2YSzr2k T his was the exact size replacement for the existing RV Skylight. We found a wide range of sizes on Amazon.
 Dicor Self-Leveling Lap Sealant https://amzn.to/2LGSXgF Creates a secure, secondary seal along the roof’s edges, air vents, vent pipes and screw heads. Compatible TPO RV roofs.
 6-in-1 Painters Tool https://amzn.to/2HlK5ce 6 uses in one tool include gouger, scraper, putty remover, spreader and roller cleaner. Great for removing laps sealant from your RV roof.
 Black and Decker Cordless Drill https://amzn.to/2wVlCUX This is a very handy drill for general installations plus those quick fixes – a loose drawer, replacing cabinet screws or just minor maintenance where a good cordless drill is needed.
 Kline 11-in-1 Multi Tool https://amzn.to/2JPLM3x It would be great to have a toolbox filled with every tool I may possibly need. This is one of my favorites. I keep this multi-tool screwdriver in the RV for those times when you just need to tighten something. Well made and a good quality product.
 Not sure about what RV accessories you need as you start RV travel? Check out our RV Accessories page where we have listed a wide range of products from essential items to those “nice to have” RV products to make RV life more enjoyable. Every item listed is being used or has been used by Joan and I as we’ve traveled across the country in our RV.
Receive the latest updates from I Love RV Life! Sign up to receive an email notification as we post new RV travels, RV tips and information about RV life in general. It’s simple. Just enter your name and email address on the right side of the page and click subscribe.
Purchased use of Digital Juice BackTraxx 1 End User License Agreement for Travelin. The Music may be used, altered, or incorporated according to the guidelines described herein into any production (including but not limited to, broadcast, commercial, industrial, educational, and personal).
SEE OUR COMPLETE LIST OF BLOG TITLES
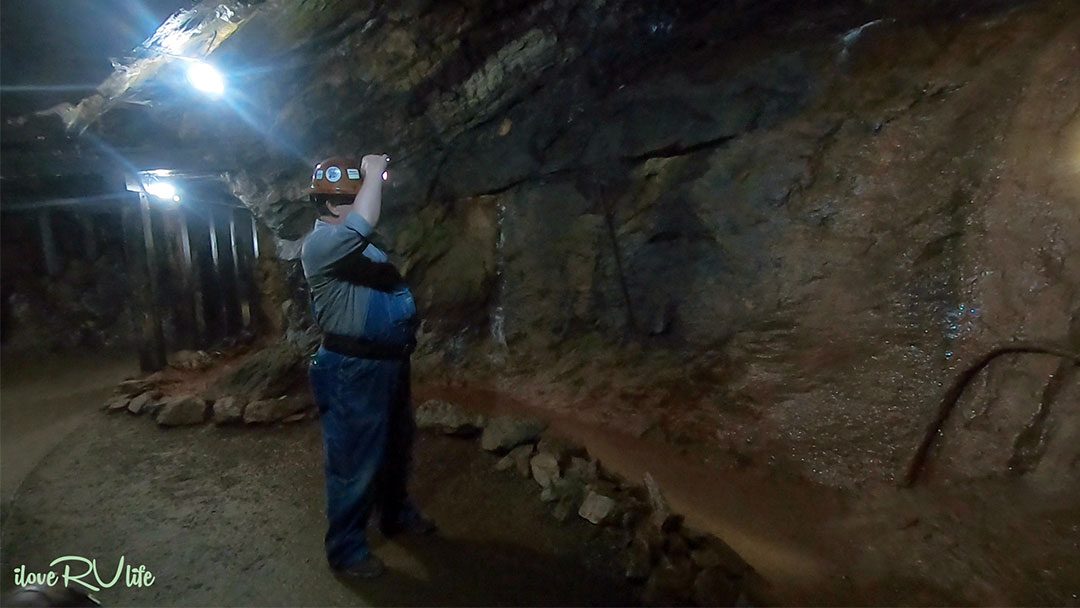
 Consolidated Gold Mine hasn’t operated in over 100 years, but tours are offered every day into the largest hard rock gold mine east of the Mississippi. We had a great tour guide who offered not only the history of the mine, but life in general for the miners who worked the rich quartz veins for Georgia gold. The tour took us deep underground into the mine shafts where gold was mined, where gold deposits still exist, to the tools used and even how dynamite (without the boom!) blasted tons of rock to expose rich deposits of gold.
 Leaving the mine, there is an amazing display of gem stones taken from around the mine and surrounding area along with beautiful jewelry created by the amazing artisans who work at Consolidated today. And adding to the fun, we finished our tour panning for gold. Dredge is brought from the bottom of the Chestatee River and my pan delivered 3 small nuggets. Maybe I didn’t strike it rich, but I had a ton of fun!
 Our next stop was in the heart of the downtown square. The location of the restored 1836 Lumpkin County Courthouse now houses the Dahlonega Gold Museum. The beautifully restored building is made of brick from the surrounding area and is said to contain gold in each brick. Fitting now that the old Court House is home to the gold museum. The lower floor contains a number of historical elements from large gold nuggets, some weighing over 5 ounces, to an amazing collection of extremely rare gold coins minted at the Dahlonega Mint up to the beginning of the Civil War.
 Our search for gold didn’t stop at the mines or the museum. Our walk along the square and side streets offered more history into mining. Many of the building built during this period still stand. Large scale mining implements are on display on the side streets.


 After a year plus of travel, we needed to make a few improvements. First was the access door. Originally, we used peg board thinking air flow from the garage area would be needed to ventilate the litter box area. The assumption to ventilate was correct, but the peg board was not a good idea. We found in the spring and fall months with the windows and doors open, this created a draft, drawing odors from the litter box area into our living space. Fortunately, the fix was simple. A trip to a home improvement store and a purchase of a quarter inch thick piece of plexiglass provided a seal around the garage door opening.
 But we still had an issue. How to ventilate the area where the litter box is located. Simple, an inexpensive 12 volt computer fan. Since we had an LED light in the area, the fan addition was simple. Drill a whole to fit the circumference of the fan, splice into the 12 volt wire feeding the LED light and face the fan output to pull air out of the box area. Next we had to vent the fan output. We did not want to introduce odors into the garage. A vent typically used for RV battery installations proved to be perfect. Adding a flange to the outside of the box, a little 1 3/4″ flexible tubing and the battery vent drilled and installed into the side of the outside wall now provides the positive air flow needed to vent the litter box area. The fan has very low wattage requirements and is very quite.


 Next was to find a power source. This effort took half of the project time. Here’s the challenge. I wanted a fuse source that only worked when the ignition switch was turned on. If the truck sits for days or longer, I won’t run the risk of draining the battery. I also didn’t want to use a fuse the was in use that may have high current demands. This could create a situation of blowing the fuse with the addition power demands of the kit. Referring to the truck owner’s manual, I found the fuse panels and use of each, then using a digital volt meter or a simple 12 volt test lamp, I verified my fuse power source was on with the ignition on and off with the key removed.
  Lastly, insert the fuses into the fuse wiring adapter, insert the adapter into the fuse panel, gently secure the excess wires behind the panels or glove box, replace all covers and you’re done.